Tuesday, August 12, 2008

Finishing the inside of the boat after fiberglassing the hull


Well it’s been a while since I have posted to my blog but I have still been working on the boat. So I thought I would take a few pictures and put them on so you could see were I was at with the boat. I can tell you that the finish work takes longer than the build part.

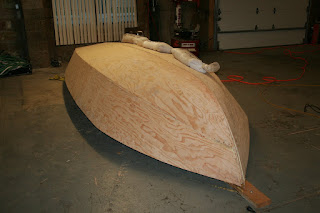
I fiber glassed the bottom of the hull and there was lots of days that was just drying time and curing. I have left the bottom smooth finished until later and I will come back and paint it after I complete the paint work on then top. I painted the inside of the boat with the marine paint from Glen L and it has come out pretty nice. I put on several coats of primer first to cover up the wood. It has taken and entire gallon of paint to get the inside of the boat painted and it still needs a final coat. I fitted the deck on the boat and plan to paint it white also. I thought I would finish the last coat on the inside of the boat when I painted the deck. I wanted to paint the inside before putting the deck on so it would be easier to paint. I used a spay gun to paint the inside and will use if for the rest also, it makes the finish look really nice and smooth.

It has taken a lot more paint and fiberglass than I thought it would but it might be because I like to make things really nice and I can be picky about the finish. I am going to fiberglass the edges around the deck and the sides so there will be no possibility of water coming in the sides. I hope to paint the deck and have the inside finished painted this week. I will put the floor and the seating in it next week hopefully. Then I am going to flip it over and finish the bottom after I get my mast in. I want to get the mast in because I am unsure if the bottom of the mast holder needs to bolt through the floor to the outside of the boat. I think it will just screw to it but I am going to wait to finish it after I get a look at what comes with the mast kit.


Wednesday, June 25, 2008

Final Framing and Planking

For the past week or so I have worked to set all the chine logs and finished all the frame work. I made a mistake on the breast hook where the sheer clamp connects to it. I thought it needed to go on the bottom with screw drilled into it. But after looking at it when I started to fit the outside planking I noticed it did not look right. So I cut them loose and moved them to the top side if the boat was flipped upright. That seemed to put everything all into place. I also moved up the Sheer clamps to make them match the stem better. I figured since I had to do all that might as well do it all right.

I also worked on fitting the side planking; I used a paper template for the first one and cut it all out. I put it on my scarfed together plywood sheets that are now 16 foot long. Traced around the template and cut it all out with a skill saw, it all went a lot smoother than I thought it would. After fitting the first one I put it on the other side to see how closely matched it was and it looked pretty good so I used it for a template and cut out the second one. Everything went looks well after being glued and screwed together. I will need to do some Bondo work but that’s ok it will all work out.

The past few days I fitted the bottom planking on same as the sides. The front bend part is the hardest by yourself. I had to lean on it and drive in a screw as fast as I could, was not much fun but I got it done. I used sandbags to help me hold the last sheet in place since I could not use any clamps to help. I also put in all the screws as I went to help hold it down to the glue better. I think it turned out better than I expected and I plan to start the finish work on the outside to smooth it all up today. I ordered the fiberglass and it should be in this week so I can work on it this weekend.

Monday, June 16, 2008

Setting the chine logs


Over the weekend I attached the outside chine logs, I did one on Saturday and the other on Sunday. I let each one dry over night so that I wouldn’t be pulling on the frames and distorting everything I had just worked on before the glue had set up. It all went pretty well although I am not completely sure I did it all right but I will add filler later on during the fairing process. Most of all this gets covered up with plywood and fiberglass and I plan to fiberglass the internal seams around the frames when I flip the boat later. I used some wet towels on the hardest bent part of the boards to help to ease some of the stress on them. I used motorcycle tie down straps and ratchet straps, they worked better than clamps and really pulled it together well.

Thursday, June 12, 2008

Setting the keel and breasthook


Today I worked on setting the keel and checking for center alignment on the frames. I worked on lining it all up first with a string over the middle and it all looked pretty good. I noticed the frames are off the one side a bit and it caused me to have to reset the transom to get it all square. I regretted having to take the transom loose because of the angle it has on it. I did it relatively faster than the first time I mounted it so that was better.

I decided a while back that I would not cut any of the notches in the framing just because I didn’t think it would all line up right. The way I am doing it is to lay the board up on center were I want it on the frames then draw lines around it and then come back and fit them. I did one at a time working my way forward chiseling and sawzall’ing it all. It all worked out well and I mocked up the fitting of the keel before I glued anything. I glued it all up and used straps and clamps to hold it all overnight. I put wedges in centerboard area to be sure the straps did not pull it into the slot I had cut.

I also fit the breast hook and I am having a hard time trying to figure out how to hold the base secure while I work above. I figured after the keel sets up in the glue it will be better. We will see tomorrow.

Wednesday, June 11, 2008

Hanging the centerboard and mounting frames


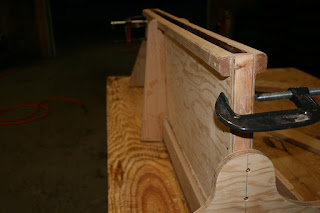
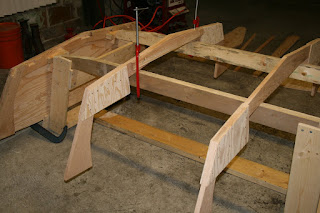
Ok today I feel like I actually am gaining ground on the build. I think maybe because it looks likes something, maybe like fish ribs, but at least it’s a start. I have the trunk mounted and the outer frames attached to it and lined up. I have glued it all together and tomorrow I will put the screws in it. As I was setting up the frames I came across another problem that took me a while to sit and look at to figure out. In the plans it says the setup member log on frame #1 needs to be flush on the jig and that was a head scratcher. I had laid a board on top of all the frames and it just was not sitting flat on frame #2. At first I thought about cutting a notch in the jig and lowering frame #3 to get the board to sit flatter across the top of the frames. Before I did that I sat and looked at it for a while and thought hey frame #1 is too high and besides it was going to be a steep bend in the plywood to get it to touch the transom. Then I figured it out I need to notch the jig and let the frame drop into it some so that the setup log will rest on top of it properly. After notching and letting it drop down its all nice now and looks really good. I attached a picture of the drop in notch.

Things are moving along pretty well now and I put the stem on the front just to see how square it all was. I will be hard fitting the stem tomorrow, I have clamp on it now. I also am gluing the breast hook together for placement tomorrow also. I have glued together some boards to make the wedge needed for the front of the stem to hole up right and will attempt to cut the angle on it tomorrow.

My sails came in today that I purchased from eBay, I haven’t looked at them yet I did not want to spread them out on the dirty shop floor. I will take them out into the grass tomorrow and have a look.

Tuesday, June 10, 2008

Centerboard Trunk and frame


Today I finished the centerboard trunk; it has been quit the project. It has taken me 4 days to finish, most of the time it was just waiting for things to dry along the way. I have sanded it most of the way so there will be less prep for paint later. I have learned many things about resin and fiberglass by doing the trunk inside section in glass. This will be very useful when I start to do the bottom of the boat later.

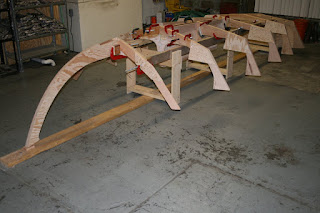
I came up with an idea today to hold my frames on the jig pretty well. I screwed some 2x4 scraps to the jig vertical and then c-clamped from the side of the frames to the side of the 2x4 pieces, (see pictures attached). It worked really well and all is square and secure.

I have the frame mounts attached to the end of the center board trunk for everything to hook to on the jig. Tomorrow I will start to align the frames with the trunk; I am sure its going to be tedious some. I am looking forward to getting all the frames on the jig; it will look like I am doing something I suspect.

I had some time this evening and went ahead and glued part of frame 5 so it can dry overnight. I will glue the other half tomorrow morning so it will be drying during the day. I had to trim the laminated sections back to fit the center log. On the print it does not show doing that but it overlaps and there is no clearance for it on the back side. Attached pictures.

Saturday, June 7, 2008

Center board trunk


Ok between yesterday and today I have been working on fiber glassing and assembling the centerboard trunk. I have been doing quite a bit of research to see what is going to be the cheapest way to do the fiber glassing. By doing the centerboard trunk now it’s giving me an idea what is going to be involved in doing the bottom of the boat. Here are some of the things I have done so far to check to see how hard it would be to buy some of the materials local to do this. First of all I live in a small town and my options are not big, there are three hardware stores, one with a lumber yard, and one auto parts store. First I went to them all looking for the resin and only could find it at the hardware stores in quantities of like 2 oz. or so. My auto body friend said the auto parts store should have it and he was right. They at least had enough fiberglass cloth and resin in stock to finish the trunk. They had the cloth in an 8x8 sheet and that is the biggest they offer so getting any large pieces local is out. They had the resin in quart sizes and I purchased two. They also have the resin in gallons on special order, the gallon price is $79 and the 8x8 section of cloth was $13. After looking on eBay for a while and the net for a better deal there really isn’t any. I have decided that I will be purchasing the kit that Glen L offers for $416 in the next couple of weeks. They also throw in some accessories for the application process that I wouldn’t get any other way and the pricing is about the same as everyone else. They also have the material in one piece rolls so that will make it easier to keep a nice finish for later sanding.

I worked on the trunk preparing to apply the fiber glass today. I rounded up some router bits to bevel all the edges and then I belt sanded the frame all smooth and square. I have mounted the trunk logs vertical on both ends with a sheet of the ¼ plywood. I attached with all the nails they required in the directions which looks like way to many. I set them all below the surface with a punch and plan to Bondo over them when I paint the trunk later. I also screwed the outside trim piece and the bottom to the trunk and sanded it all smooth. Then I flipped it over and proceeded to lay the glass. It all went pretty well and towards the end it started setting up already so I had to work faster and scrape off any excess resin. I didn’t think it would harden that fast and I worked at a pretty good pace hoping to avoid any of that. This all showed me that I will need to work a smaller area when I lay the bottom of the boat later. I figure about a 2x2 foot area max which takes a little under a half quart to do. Tomorrow I will be sanding it smooth on the inside and will get the second half ready to attach.

The fiber glassing is going to be a little slower that I expected so I can do only a little at a time right now. I have cut and tried to finish out anything else I could on the prints and have worked ahead as far as I can right now. Today while that was all setting up I beveled the edge angles on the rudder and also rounded the tiller arm. Tomorrow after I finish glassing the trunk I will probably fit the tiller arm to the rudder. Until I get the trunk finished and dried out it will be slowing me some.

I found a pretty good deal on eBay that I have been working for a while. I found someone selling the original made for the Glen L 15 sails. I have made several offers on them and we finally settled at $355. It took me a while to get them to post pictures and I didn’t want to buy any old junk sails. They say they are like new and from the pictures they look pretty good from the pictures they finally posted for me. They should be in my hands next week and I will be posting the pictures they had of them also. That was half price from Glen L there’s are $700 so I hope they are good.
Thanks for the comment Michael I am glad someone else is reading what I am going through and can relate to what a project it is. I really am enjoying it though, if you have any comments on any section that you are working on as well post them and I will approve them to be put in the Blog so someone else might see a different perspective to our builds. Pictures attached


Thursday, June 5, 2008

Centerboard trunk and frames


Today I finished up the frames, I received my ¼ plywood yesterday and worked hard on them today to complete. I have them all sanded and faired out. I placed the first two frames on the jig were they are supposed to be and have started work on the centerboard trunk. Tomorrow I will need to get some resin to finish the inside of the trunk. I hope to have the trunk completed tomorrow and will work to line it up on the jig with the frames.

Sunday, June 1, 2008

Jig assembly


Ok today I made some pretty good progress; my intentions were to get up this morning and go get the lumber for the jig assembly. I was at the lumber yard as soon as it opened, which was 10am today its Sunday. They had all the lumber I wanted so I purchased and headed back to the shop. I also made several other trips back to the lumber yard today fortunately its only 2 blocks away. I needed some lag bolts to screw the jig frame to my concrete shop floor and also some wood screws for the assembly of the jig. For the most part all went pretty smooth assembling the jig but it took most of my day. I measured and then re-measured everything to be sure that it was square and solid according to the plans.

I had some time at the end of the day and wanted to hang my transom that was finished and ready. That took me a couple more hours squaring and centering and making sure the angle was correct. I needed a couple of clamps that were over 10 inches but did not have any today and wanted to get this in place today. So I hesitantly put a couple of screws through the transom to secure it in place for all the planning I will have to plane the top of transom to get the correct angle it needs. I figure I can resin the holes shut and it will not be a problem I plan to paint the boat anyway so they will not be seen.

Attached some more pictures with some close ups of the angle of the transom and my Jig assembly.

Thursday, May 29, 2008

Other frame pieces and transom cover


Ok today I worked on more pieces of the framing and the center board box. The ¾ plywood came in today at the local lumber yard but I still have to wait for the ¼ sheets. The ¼ sheets of plywood are not expected in until the middle of next week and I suspect that is going to slow me down some. My bronze screws and nails are due in tomorrow that I ordered direct from Glen-L.

Today I cut all the ¾ plywood braces for the center of the frames; they are what all the frames level out on while they are sitting on the jig that I still have to make. Speaking of the Jig I am thinking I will go ahead and make that this weekend while I am waiting on the plywood to come in. I also cut the rear cover for the transom out of the ¾ sheets. I had to purchase a 1 ¼ piece of wood today instead of what I wanted in 1 1/8. The lumber yard did not carry the 1 1/4 so I came back to the shop and ripped it down to the 1 1/8 then. It made me kind of nervous doing it and my employees took cover. I had to raise the blade up all the way to make the cut and flip the board over to twice to do it. I cut it from a 1 ¼ x 6x4 board in Douglas fir, that was the closest thing the lumber yard had. After some serious thinking about what I was doing I got it done. It wasn’t perfect but I sanded it flat with a belt sander and got it looking pretty good. I don’t have a planer and that would have been really nice in this situation. I plan on purchasing the planer in the future for other projects if this one goes well.
Everything is starting to look nice and I will have a lot of gluing, screwing and nailing to do. Tomorrow I plan on cutting out the stem and bow hook. I may do the center board also and the rudder. I haven’t looked at the plans today but I think they are all out of the ¾ sheets also. I attached more pictures of my progress today.